

Which Software Has A Nice Template For Timeline
Adding tasks to a timeline in Microsoft Project is adequately straightforward, however, Microsoft Project doesn't include a basic timeline template. If you don't take time to observe a timeline template from a third-party vendor, you lot'll need to manually create a Gantt chart in Microsoft Project first.
Hither's how to create a Gantt chart and then employ that data to build Microsoft project timelines.
i. Create a Job Listing for the Microsoft Project Timeline
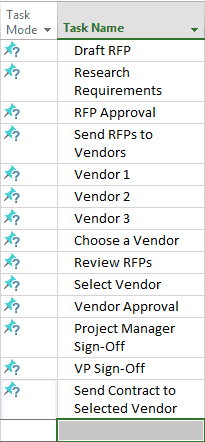
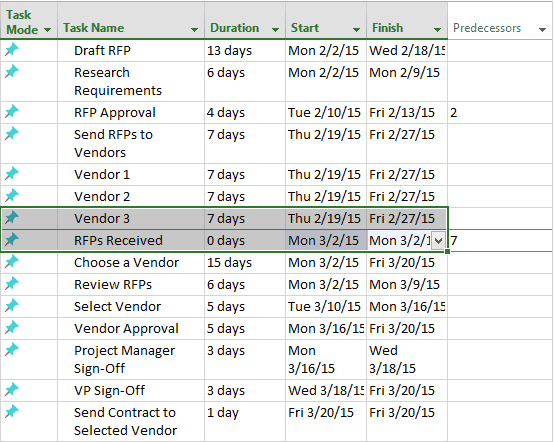
The outset step in building a Gantt chart is to create a listing of required tasks. Endeavour to prioritize the tasks in the society they need to be completed. Even if there are dependencies involved, put in tasks that demand to happen first.
- Open up Microsoft Projection and click Blank Project.
- Add the list of tasks for the project to the Chore Name Column.
2. Provide Start and Finish Dates for Your Timeline
Now that your tasks are added, y'all need to provide start and finish dates for each one in the projection.
- Click on the Start jail cell for the first task.
- Enter the start appointment past clicking on the pointer in the box and selecting it from the agenda or enter the dates manually.
- Enter the end date for the task by clicking on the corresponding Finish cell. Click the arrow in the box to select a engagement from the calendar or enter the dates manually.
- Leave the Duration prison cell empty, Microsoft Project will automatically populate the amount of days the chore will take.
- Complete Beginning and End dates for all other tasks in the projection.
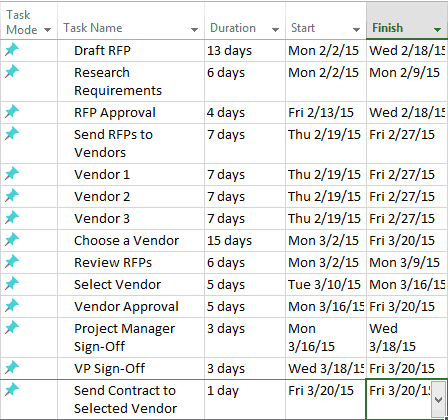
3. Group To-Dos Together that Pertain to a Unmarried Task
The benefit of grouping tasks together is that you're able to collapse or expand the specific steps required to complete a phase of the project. This can help track a particular role of a projection and help y'all identify dependencies.
Kickoff, you'll need to create sub-tasks.
- Create a sub-task by clicking on the rows of tasks that are related to a specific phase of the project. These tasks should be listed under the projection stage. In this instance, click and highlight Enquiry Requirements and RFP approvals. To add together multiple rows, hold downward the Shift primal as you click each row.

- Once the rows are highlighted, click the right indent icon in the ribbon bar. Once you click the indent icon in the ribbon bar, Research Requirements and RFP Blessing will become sub-tasks of Draft RFP.
- Use the same steps to create sub-tasks for the unabridged projection.
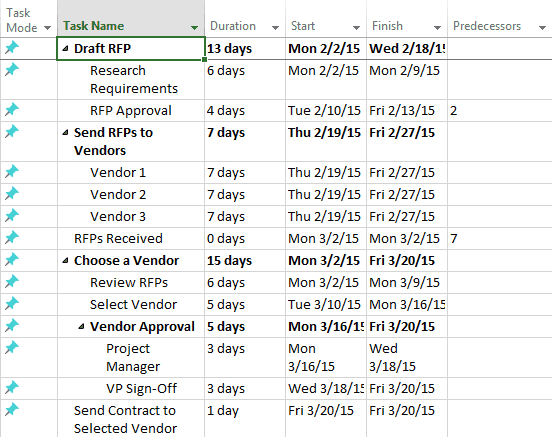
four. Add together Milestones to the Timeline
Milestones are a slap-up way to see if the project is running on schedule and to indicate the end of a particular stage.
- Create a Milestone by adding a new row, putting information technology where you want it to announced in the timeline. Click the row to add a Milestone.
- In the Task tab, click the Milestone button in the ribbon bar.

- Click in the cell that has New Milestoneand blazon a proper name for the Milestone. The Milestone will appear as a diamond on the Gantt nautical chart.
five. Link Related Tasks to the Milestone
One time you've added a Milestone, you'll want to link it to the Task that has the complete date.
- Click on the Milestone in 1 row and concur the Shift key down while clicking on the task(s) you desire to link it to. The rows will be highlighted.
- Click the link icon in the ribbon bar to link the tasks. You can as well link other Tasks together by following the aforementioned steps.
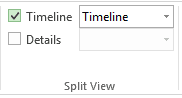
vi. Turn on the Microsoft Projection Timeline Feature
If the timeline feature isn't automatically turned on (if it's activated, you'll run across a blank timeline to a higher place the Gantt chart), you'll demand to manually turn information technology on.
- Click on the View Tab. Then click the box side by side to Timeline in the ribbon.
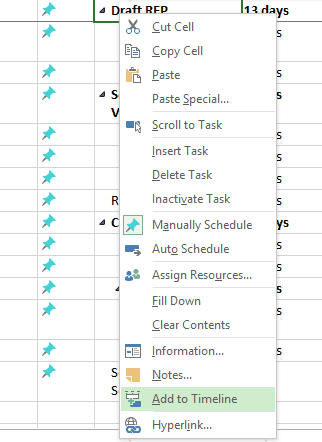
7. Add Tasks to the Microsoft Project Timeline
In one case the Timeline feature is activated, yous tin can add your tasks to it. Once you add together these items, you lot tin can likewise customize how the information is displayed by assigning colors and calculation/removing titles.
- Click on the chore to add together it to the Timeline.
- Right-click on the mouse and click Add to Timeline. The task volition appear on the Timeline.
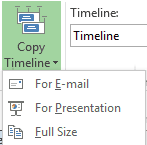
viii. Share the Microsoft Project Timeline
In one case you are happy with the way the timeline looks, yous tin share it with others via e-post, or add information technology to a presentation.
- Click the Format tab at the meridian of the screen and click the arrow nether the Copy Timeline button in the ribbon.
- Cull how you desire to share by clicking For Electronic mail, For Presentation, or Full Size.
Smartsheet
Microsoft Projection will save a copy of the timeline to your clipboard. Next, open the plan you want to apply for sharing, either PowerPoint or east-mail, and paste information technology in.

Which Software Has A Nice Template For Timeline,
Source: https://www.smartsheet.com/blog/how-create-project-timeline-using-microsoft-project
Posted by: boydmixtiffinuel.blogspot.com
0 Response to "Which Software Has A Nice Template For Timeline"
Post a Comment